I’ve slowly been revamping my living room over the last year or so. A lot of what was in our apartment were pieces we accumulated from friends and family during our college/school days. This is what it looked like before (dear God 😱):

Photo quality aside, the furniture overtook the space and made it difficult to move around, plus nothing coordinated. It was just a mash-up of collected things without a cohesive look in mind. A few IKEA and Target home purchases later, we had a much more livable space that reflected my modern-meets-70s vibe. But our walls needed some love, especially the big blank one above our couch. The frames, which I bought at IKEA and the mini shelves from Target were a great fit. Now I’m all like, “Where can I hang another gallery wall?” Maybe I’ll just turn my entire apartment into a gallery and charge people to come in????
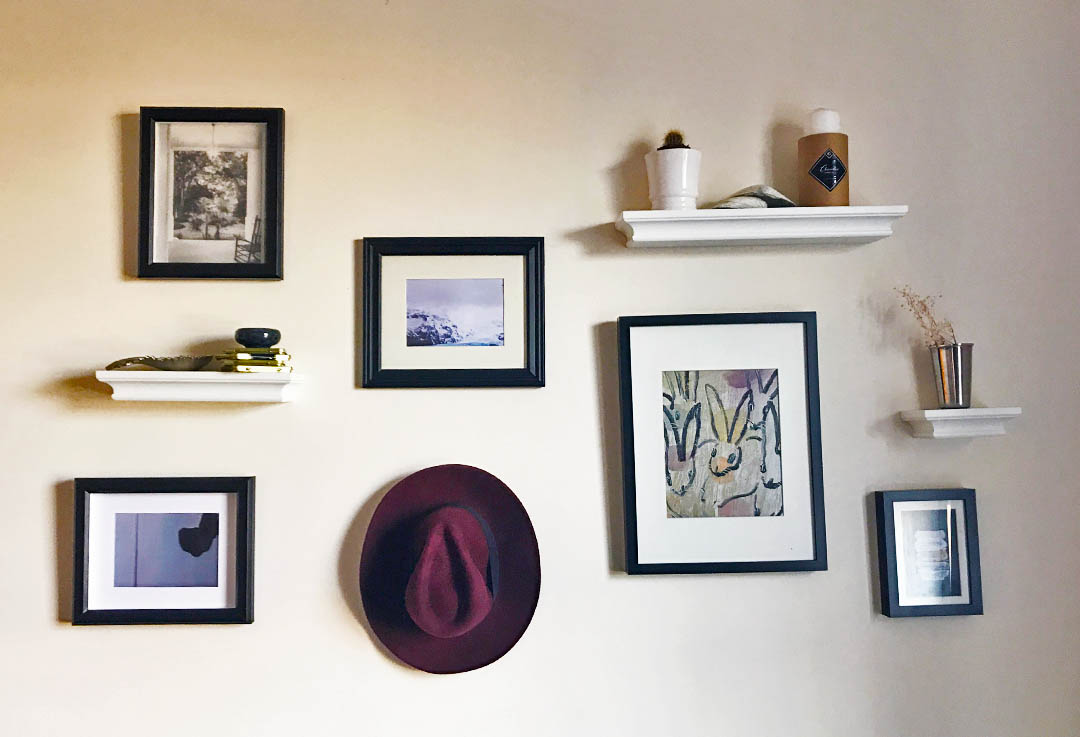
And the updated look (more pics below):

Anyway, now that I’m basically a gallery wall pro (🙄), here are my tips on how to create a living room gallery wall for your space:
Research living room gallery wall ideas on Pinterest. That way you’ll have a basic feel for how spaced out or dense you want it to be and a general idea for how you’ll arrange things.
Choose frames and shelves with similar finishes, but different sizes. The wall is going to look super flat if every frame is the exact same size (unless you’re going for that minimalist vibe). And too many finishes can look sloppy, so limit it to 1 to 3 finishes that work with your space and each other.
Don’t spend a fortune on art, but it should have some meaning. Unless you’ve got the dough to shell out or really enjoy supporting local artists, dropping a ton on art for a gallery wall is not necessary. It’s nice if it has personal meaning or reflects you–a fun conversation piece for when guests come over. The bunny art on my wall is a piece from when I worked at an interior decor firm and got to visit Hunt Slonem’s art studio. He’s famous for his bunny paintings and the huge wall of them in his studio (see a pic here). The other photos from Iceland that I took from a friend’s magazine–Rose & Ivy Journal–and pic from our trip to New Orleans a couple years back. I’ve wanted to visit Iceland for ages, so it’s my motivation!
Sketch out your layout before drilling holes in your wall. I loosely sketched out how I wanted to lay everything out, fitting things together like a puzzle, to have a game plan to follow as I began to hang. This is probably the most crucial part of the outcome being successful for me.
Hang with the right tools. Seamless hanging without the use of wire isn’t hard, but requires a few small things like picture hangers that you can pick up at your local hardware store or even the dollar store. This video and this video are both super helpful for showing you what you need and how to properly hang picture frames.
Consider hanging more than just picture frames. I wanted my gallery wall to have more personality and dimension, so I peppered in some mini shelves (as I mentioned, bought at Target), and one of my favorite hats, which I plan to switch out with other things as the seasons change.
Do you have a gallery wall in your home? If not, where would you want to put one? Let me know if you have any questions about mine!


GET THE LOOK:

LEAVE A COMMENT